Daily Quote

You are what you deepest desire is. As is your desire, so is your intention. As is your intention, so is your will. As is your will, so is your deed. As is your deed, so is your destiny. ~Upanishads text.
What is your deepest desire?

Showing posts with label hair. Show all posts

Wednesday, January 5, 2011

Dye Hair Naturally with Indigo, Take II

Hello Everyone....

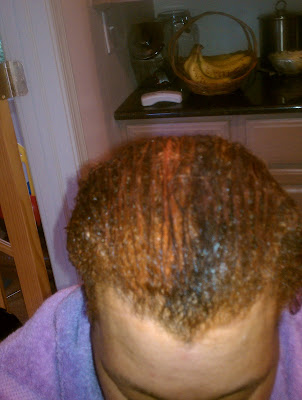
I just wanted to post a quick update regarding my new found infinite love for dying my hair naturally with INDIGO.  My hair is already dark brown, but the Indigo transformers my locks into a rich black, which I love!  In the summer, I enjoy using just henna (Click here for my Henna process) which gives my hair red highlights, but I love the rich black luscious hair results with indigo for the winter.  This is the 2nd time that I've dyed my hair naturally using Henna and Indigo and I have nothing but good things to say about the process.   I am pretty much a pro now, (tooting my own horn, "beep-beep") so there is no messy clean up anymore!  To check out my complete 2 Step Process on How to Dye Hair Naturally using Henna and Indigo, Click Here.


Do you Henna?  Do you Indigo?

Monday, January 3, 2011

Feather Hair Extensions by Fine Featherheads

Hi lovelies!

If you read my previous post on Feather Hair Extensions, I dished a bit on this FAB hair trend.  I think the feather hair extensions are just darling and add a little bit of pizazz to any hair do!  Especially in the winter months! 

Well as promised, here are some pics that my friend so graciously let me take of the feather hair extensions in her hair and post on my blog!  Her stylist put them in and I think they look amazing.....


Aren't they FAB!?

Tuesday, December 28, 2010

Curly Nikki Fierce Friday Feature!

Hi Everyone!

I just wanted to post a quick note regarding my recent feature on CurlyNikki's blog this past Friday (Christmas Eve) for her weekly "Fierce Friday" feature! Each week the fab CurlyNikki features several ladies who rock their Natural hair-- meaning chemical free hair!  Some ladies rock naturally curly styles, braids, twist-outs, straight styles and curled styles etc..whatever their fancy.  Check it out here when you get a chance.  This is once of my favorite styles right now and I achieved this with my Curlformers.

Here is a re-post of my feature on CurlyNikki.com:

Hola chicas!


It's that time again! The images below are of CN readers at their flyyest...at work, on the town, and with the fam. Showing us all that natural hair is not a fad, it's a way of life...an extension of our beauty! Click on the images to enlarge them:

Sharron
My hair was styled using extra wide and long curlformers, and is about 3 days old in this pic. I slept in the curlformers the first night to dry (no heat) and pincurled each additional night to retain the style. I was not headed anywhere, just in the house from running errands all day!

Saturday, December 11, 2010

Feather Hair Extensions by Fine Featherheads

For those of you who like to stay on top of fashion and hair trends, you should consider Feather hair extensions by FineFeatherHeads.com! I know this sounds a little far fetched, feathers in your hair?  Who knew?  But when done in moderation, its extremely cute, fun and flirty!  Don't take life so seriously :) 

You can get these done at by your participating stylist at your local salon that provides the service or find them at finefeatherheads.com and do them yourself. My friend had these done in her hair over the weekend and they look fab! It's very subtle and you can do as little or as many as you like!!!!! I'm thinking "less is more" so I'm planning to have a few thin strains added to my "do". The great thing about this < "hair art" you can manipulate the feathers to fit straight or curly styles! These look great with loose or sleek ponytails, chignons, in bangs, straight, wavy or naturally curly hair. These add an extra level of fun to plain ol' boring hair! Here are some pics I found online with the featherheads in the hair:


My friend's stylist added only a few thin strains to her hair, why I like a bit better then the ones in the pics above, at least for me.

This style definitely speaks to the stylist, chic, Bohemian princess in you!  Would you try these? I'm excited to try these! What do you think?

Wednesday, December 1, 2010

Another Great Reason To Love Curlformers!

So, if you have been following any of my Curlformers post, some of you may be interested in this, espeically if you are a naturally lady transitioning from a Relaxer. 

This past holiday, I decided to style my hair with my Curlformers and sit under the dryer.  I did my normal process and used my normal products.  To my dismay, my hair was not completely dry when I took out my curlformers!  I didn't sit under the dryer long enough. What's a girl to do??? I had to be at Thanksgiving dinner in 40 minutes!  So, I did what any rational, reasonable, lady would do.. and came up with plan B!  I had no idea how this was going to come up but I went for it!  The Natural Oasis Setting lotion that I used to set my curls, makes my hair super soft.  I took all of the curlformers out of my hair and:

1.  Applied some amla oil to my scalp
2. Took my paddle brush and began to brush out my curls and wrap my hair around my head.
3.  Took some saran wrap and wrapped it around my hair.
4.  Set under the dryer for 5 minutes
5.  Viola!  WOW... my hair looked like I just had a Dominican blowout! 

My hair was super straight-- but with wavy body!  I didn't even have to "hit up" the edges and roots with a flat iron to tame my hair....   :)

Another great reason to love Curlformers!  The style actually came out just as good as my old faithful roller set on my natural hair!  Although my end style was not what I planned, I was truly pleased with my Accidental Straight Hair!!!!

Friday, November 19, 2010

Natural Hair Products Swap!

Happy Friday!

I hope everyone is ready for an exciting weekend! Saturday's and Sunday's are always the best!

Have you purchased an all natural hair product recently that just doesn't do it for you? Is it collecting dust in your product closet or under your sink?

Well, you should participate in Today's Swap a Natural Hair Product Friday! It's really simple to participate!

Rules:
1. Follow this blog.
2. In the comment box below, type the products that you have to swap and the products you like! Product should be ay least half full.
3. Check back for comment updates and find your match! I will facilitate.
4. Contact the follower directly and viola! ....exchange info and Swap!

The swap will run through December 10th.

This is right around holiday time and who wouldn't love to receive a package in the mail? Have fun with it and maybe wrap it in festive wrapping paper or add a bow!

HAPPY SWAPPING!!!!!


Disclosure: The contest is run on a good faith basis. The blog owner is not responsible and the swap is at the sole discretion of the participants.

Monday, November 8, 2010

Dye Hair Naturally with Indigo!

Well, the months are getting colder and the days are getting shorter... The easy breezy summer days of 2010 have come and gone. What does that mean for me? Time for change! This weekend I am planning on dying my hair black (its currently dark brown) naturally with with Organic Indigo. I recently dyed my Mom's salt and pepper hair with Indigo and covered ALL of her grey with amazing results! She wanted a chocolate brown/dark brown color and we achieved it beautifully.

So this weekend, I plan on doing my monthly henna treatment and this time.. drum roll please... following it with a dose of Organic Indigo.  The Indigo will darken my henna, which currently gives me reddish brown highlights in the light.  It was perfect for summer and fall, but winter calls for change. I plan on leaving the Indigo in for about 45 minutes (the longer you leave it in, the deeper the stain) resulting in dark brown/black shiny hair!  I am excited!  I love dark hair in the winter! 

What do you think?  I am excited to share my results!  Please check back soon for updates....

Some Indigo History:

Indigo comes from the ground leaves of the indigo plant which contains a deep blue dye.  The leaves of the plant are harvested, dried, and ground into a powder.  In modern day, Indigo is most commonly used to dye jeans, but has been used as a hair dye for centuries and many cultures still use this as opposed to chemicals to dye hair.  Indigo combined with Henna is a great ALL NATURAL replacement for modern chemical dyes and is non-damaging!  

Indigo Results:
  1. Mix Indigo and Henna together, you achieve a medium brown to rich deep brown hair dye.
  2. Apply Indigo AFTER Henna application, you achieve rich, shiny black to jet black color.
  3. Indigo and Henna together cover grays.  (click here for pictures!)
  4. Adds incredible shine to dull hair!

I'll post before and after pics!

Sunday, November 7, 2010

The Perfect Roller Set! Natural or Relaxed Hair

I'm a wet set/roller set pro, if I must say so myself! I've done my roller sets and several others since I was about 10 years old. My mom taught me how after she noticed my obsession with doing my dolls hair! I was always cutting and/or styling my dolls hair or making them clothes!!! I digress....

I love roller sets on my natural hair. I roll my entire head in 15 minutes! I of course use:

Jane Carter Leave in Conditioner and that's it!

Roller setting hair is a piece of cake once you get the hang of it. The trick is in the parting of your hair and the tight hold of the rollers.

What you need:
Rat rail comb
Rollers
Metal clips
Coconut oil or almond oil

Step 1:
Starting in the front of your hair, take the tail of the rat tail comb and part 1/2 inch at most on both sides from the center and apx. 2 inches back. Part another 1/2 of hair, horizontal. This will be the first roller.

Step 2:
Take comb end of rat tail comb and comb out any tangles. Take roller to almost the end, holding hair tight against the roller and roll down holding hair tight. Once roller reaches head, clip with silver clips.

Step 3:
Repeat step 2 for top 2/3 rollers in front of hair. Starting on your dominate side, make another vertical part above the center of your ear ,then repeat Step 2.

Step 4:
Continue this until all hair is rolled.

YOU CAN AIR DRY OR SIT UNDER A HOODED DRYER ON THE COOL OR WARM SETTING.

Once dry, I breeze my edges with a flat iron, PLACE A SMALL AMOUNT OF COCONUT OIL OR ALMOND OIL ON FINGERTIPS AND RUN THROUGH HAIR, wrap my hair with a paddle brush, wrap with plastic wrap, sit under dryer for 3-5 minutes on warm then take hair down. You can wrap at night for ocean wave curls or pin curl for fuller curls!

NOTE: IF YOU AIR DRY, THE PROCESS IS MUCH LONGER, BUT YOU CAN AVOID HEAT THIS WAY IF YOU DESIRE.

ROLLERSETS yield amazing curl and long lasting style!


How do you roll?

Wednesday, November 3, 2010

NEWSFLASH Curlformers: Extra Wide and Long

As promised, on an earlier Curlformers post I wanted to post an update once I used my Extra Wide and Long Curlformers to achieve larger and fuller curls. I received my Curlformers on last week! (Sidebar- Super fast shipping by the way!) Well, last night after an invigorating Kickboxing class, I washed and deep conditioned my hair and I was ready to ROCK with my new larger Curlformers! The process of course is the same, NO HEAT STYLING but I DID USE DIFFERENT PRODUCTS, just for fun and I love trying new products!

This time, I used only 2 products:
Jane Carter Solution Leave in Conditioner (my staple leave-in)
Natural Oasis, Conditiong Foam Wrap and Sculpting Lotion

The Natural Oasis is new to me and is a DREAM!  OMG!  So love this! I stumbled upon this while in my local hair store last week on my quest to find an all natural setting lotion.   The POWER of PRAYER! True story-- For a couple weeks, I searched for an all natural setting lotion with no luck and was secretly dreading getting one with alcohol :/. Right before I went in the store, I prayed to find an all natural setting lotion, and there it was!!! ...recognize each opportunity as a blessing and give thanks for even the smallest of things! I will post a FULL review on this product soon but needless to say, I LOVE the combination of the Extra Wide and Long Curmformers, JC L-I-C and Natural Oasis.


My curls came out nice and full, like.. Ocean Waves with body!

Here are some pics of the final "do" with the Extra Wide and Long Curlformers:

Day 1. 
I promise to take better pics and do a vid next time! This was an experiement, but I loved my results!
Day 2
A little frizz, but still nice and curly!


Monday, October 25, 2010

Flax Seeds for a Hair Gel?

Hola! Well, I have something GREAT for everyone today!  I hope you enjoy this... Here is a new all natural alternative for hair gel... DRUM ROLL PLEASE.. Its flax seed hair gel! Many people are taking their hair products into their own hands now a days, as many hair products contain alcohol and lots of people in general, are just interested in trying new things! Well, here is the latest and greatest of things I've tried for my hair. FLAX SEED HAIR GEL.. Yes, you heard correctly.... Its made from Flaxseeds and a few other simple ingredients. This product is perishable, but can last up to about 2 weeks if kept in the refrigerator. Here is the recipe. Let me know what you think of it and if you like the results on your hair!


Flaxseed Gel Recipe

Ingredients:


2 Tbsp Whole Flax Seeds
1 cup water
Pure Aloe Vera Gel, if desired
Few drops of essential oil of your choice for scent
Vitamin E capsule as preservative
Container to house gel

Instructions:
1.  Mix one cup of water to flaxseeds and add to a pan.


2.  Heat slowly, stirring often to stop seeds from sticking to the bottom of the pan.

3.  Continue to stir gently as water comes to a boil.

4.  A frothy jelly will form.  Be sure to turn the heat down a little when seeds settle in the jelly rather than falling immediately to the bottom of the pan then turn the heat off.

5.  Carefully pour the liquid through a strainer over a bowl checking for any seeds that may have passed through.

6.  Add Essential oils or preservative.  (Preservatives will extend the life of the gel to about 2 weeks.  ie. Vitamin E capsule.  Mix the gel carefully adding any alcohol or preservatives to increase the shelf life of the gel.)

7. Fill container with gel and add Aloe Vera Gel for additional moisture, if desired.

How did it work for you?

PS.  I'm on a quest to find a recipe for a Setting Lotion to set my hair when I do my curly styles!  I want to try to make it myself, so we will see.  If you have any suggestions, please feel free to share.  I want something that will not leave my hair sticky, but will yield a nice soft finish that holds curl and eliminates frizz....

Friday, October 15, 2010

Curlformers: NO HEAT STYLING

I'm obsessed!!! I henna'ed my hair, again! Since my 5 week experiment this summer, I now apply henna to my hair once a month. This time, I used my cheap henna from my local Indian Store which cost me $1.99 for the box, and I swear that henna is amazing! Good, cheap and quick henna fix! NEW HENNA TIP: I purchased a conditioning cap from Sally's Beauty Supply Store which I normally use when I put in a deep conditioner. The cap locks in heat for maximum penetration of the conditioner. Well last night, in an effort to speed up the henna process, I covered my head with a plastic cap then placed the conditioning cap over my head to keep the henna warm and to speed up the henna process. It worked wonderfully. The cap was apx. $2.00 and I will be sure to go back and purchase another! One cap for henna treatments and one for deep conditioner treatments. Back to Curlformers!!!! I decided to try Curlformers in my hair which I have been wanting to try for months! I finally purchased the Curlformers kit from Sally's which included 40 long and narrow and 6 short and wide curlers and a styling hooks.(I will purchase the long and wide curlformers for bigger curls option soon.)

For All my NATURAL HAIR LADIES: I was truly amazed at the results with Curlformers. My hair is natural and this REALLY gave my curls an amazing finish. The process is really easy once you get the hang of it. My hair was freshly washed, henna'ed and deep conditioned. I put the curlformers in my hair while MY HAIR WAS WET. I used Jane Carter Solution leave-in-conditioner to detangle and Shea Moisture Organic Coconut and Hibiscus Curl Style Conditioning Milk for setting, body and shine and Living Proof Straight Making (No Frizz) Styling Cream for my roots. I then took small to medium sections of WET hair and curled away, following the instructions in the box. I parted in the front in the angle that I wanted my curls to set. This process took me about 45 minutes. This was my first attempt so about 15 minutes of that was trial and error! After all the curls where in, I covered my head with a satin cap and went to bed. NO HEAT REQUIRED!!!! The next morning, I took the curlformers out and was TRULY amazed at the amazing curls I achieved with no heat. I think this will be one of my staple styles. I love the results.

What would I do differently? Next time, in addition to the products I used mentioned above, I will use a SETTING LOTION to LOCK in LONG LASTING curls.

Here are some pics of my final do! What do you think?


Curlformers can be purchased at, http:// www.curlformers.com/, Sally's Beauty Supply or Amazon.com

Monday, September 13, 2010

Brahmi Oil.... Great for hair growth, sound sleep and much more

Chakrapani Ayurveda Clinic and Research Center provides a monthly newsletter with a wealth of knowledge in Ayurvedic medicine and practices. Please check out the July 2010 issue of AyurvedaNews for more information on the benefits and uses of Brahmi.

Here is the Brahmi oil that I use on my hair.  Brahmi oil is really amazing and promotes the growth of long and lustrous black hair and provides sound sleep. It also helps in curing dandruff, burning of eyes and joint pain.


In addition to Brahmi oil, see my previous post on my Top 5 hair oils.   Enjoy!... please post comments on your results with Brahmi oil!

Tuesday, August 31, 2010

Top Five hair oils

Hey dolls, 

Here are my Top 5 pics for natural hair oils....

#1. 100% Pure Coconut Oil-- Coconut oil has great strengthening qualities for your hair.
#2. Vatika Oil-- The base of this oil is coconut oil and it is enriched with Lemon, Amla, Henna and 22 other herbs.
#3. Wild Hair Growth-- This has a base of olive oil, coconut oil and jojoba oil and is enriched with other herbs.
#4. Brahmi oil by Ramtirth-- The base is coconut oil and it is enriched with Brahmi oil and 22 other herbs.
#5. Amla Oil-- Aids in encouraging hair growth, this has a base of vegetable oil. (I am currently looking for an Amla oil that has a Coconut oil base. If not, I plan to make my own at home!)

All of these products can be found at Amazon.com. I've purchased all of them and they are great products.   Feel free to check them out... the beauty of this is that NONE of these oils are expensive and they far supersede some of the expensive products that are currently on the market in my opinion.   As usual, you can add essential oil to the oil if you want to alter the smell! 


Monday, August 30, 2010

How To Henna Video Tutorial!

As promised, here is a tutorial on how to mix henna for your hair.

Wednesday, August 25, 2010

Top Three Homemade Hot Oil Treatments


100% Natural hot oil treatments for hair growth


#1 -- For hair growth
8 drops of Rosemary essential oil
2oz of Jojoba oil
2oz of Almond oil
Warm towel
Plastic cap

#2 -- For hair growth and also for clear scalp
3 drops of lavender essential oil
6 drops of Neem oil*
1/2 cup/(4oz) of Coconut oil
1 teaspoon of Brahmi oil
Warm towel
Plastic cap

#3 -- For hair growth and also for soft, manageable frizz free hair
1/2 cup/(4oz) olive oil
3 drops of sweet orange essential oil
Warm towel
Plastic cap


How to use: For each recipe above, combine all ingredients in a small plastic bag and place bag in a cup of hot water for 1 minute. Remove the bag from water and test temperature of the oil. Cut hole in the corner of the plastic bag and slowly apply the oil to dry hair from scalp to roots massaging in for a minimum of 1 minute. Cover the hair in plastic cap and cover with a warm towel. Let sit for 30 minutes minimum. Rinse hair with shampoo (2 times to get oil out) and continue normal hair regiment.

*Ingesting neem is not always safe. Consult a physician if you are pregnant or trying to conceive prior to use for optimal precautions.

Monday, August 23, 2010

How to Henna Hair and How to Dye Gray Hair Black with Indigo

Happy Monday!

(Does anyone have a case of the Monnn-day's? -- Office Space)

Well, I hope your weekend was well. I had a phenomenal weekend. This Saturday, as promised, I put Henna and Indigo in my Mom's hair and the results are A-M-A-Z-I-N-G! Below is my step by step process on how to apply henna and how to apply indigo to your hair. My mother so graciously agreed to be my client and model! Please let me know if you have any additional questions!

What you need:


100 grams of Henna
2 Cups of hot water (not boiling)
4 bags of Green Tea
2 tablespoons of honey
2 tablespoons of olive oil
Essential oil of your choice (sweet orange, lavender, vanilla etc.)
Plastic gloves (4 pairs if you plan to do Indigo as well)
Plastic cap
towels
rattail comb
mixing spoon
Application brush (optional)

*Recipe based on 100 grams of Henna. Double for longer hair.

STEP 1:
Add the green tea to the hot water and let cool. (apx 15 minutes)


STEP 2:
Pour henna into a plastic bowl.


STEP 3: Slowly add the green tea to the henna and mix. You will get the consistency of mashed potatoes.

STEP 4:
Add 2 tablespoons of olive oil and mix. Texture of henna mix will smooth out and have added shine!

STEP 5:
Add 10-15 drops of Essential oil to desired smell is achieved.

STEP 6:
Add 2 tablespoons of honey to henna mix. Texture will be super smooth. Let sit while washing your hair.

STEP 7:
Wash hair so that it's nice and clean. DO NOT condition your hair at this point.


STEP 8:
Comb down hair and divide into 4 sections.


STEP 9:
Starting at the back of the hair -at the nap of the neck, take a small section of hair and begin to apply the henna. Be sure to smooth the henna into the hair, so it coats every strand. Work your way to the front of the hair, while applying the henna so that it flows towards the back of your head.


STEP 10:
Once hair is completely covered with henna, place a plastic cap and/or wrap hair with plastic wrap. (This will keep the henna warm.)


STEP 11:
Let henna stay in your hair for a minimum of 2 hours.

STEP 12:
Thoroughly rinse henna from hair. Use conditioner to aid in removing all henna from the hair. NOTE: I use Aubrey Organics HoneySuckle Rose conditioner or Neutrogena daily conditioner which is very soothing.

If you wish to just Henna your hair, STOP HERE!
NOTE: You will need to add a deep conditioner to your hair at this point and let sit for a minimum of 30 minutes. If you wish to apply Indigo to your hair for a darker color... KEEP GOING.....

PART II ... INDIGO APPLICATION. ***Indigo will dye hair any color from dark brown to black, depending on how long you leave in your hair.***

STEP 13: Pour indigo powder into a bowl and slowly add water until the indigo turns to a paste.


STEP 14:
IMMEDIATELY after mixing, begin to apply the indigo to your hair in the same way in which you applied the henna in STEP 9 above.

STEP 15: Make sure that Indigo completely covers all of your hair for full saturation of color. Once Indigo is in hair, cover head with a plastic bag.


For brown hair: Leave in for 15-20 minutes
To achieve dark brown hair: Leave in for 30-40 minutes
To achieve black hair: Leave in for 45-50 minutes
To achieve jet black hair: Leave in for 1 hour or more


Here are some BEFORE AND AFTER PICTURES.


HAIR BEFORE HENNA:


HAIR AFTER HENNA:


HAIR AFTER INDIGO,STYLED: NOTE-- There is ZERO Gray left. The picture shows a reflection of light.


This was really fun and my Mom and I absolutely LOVE the results! I am very pleased! This will take quite a few hours of your day so make sure you set aside some time, but its well worth it! Any henna or indigo stories/questions? Do share....

Saturday, July 17, 2010

Tea Tree Oil and who knew!?

this is an old journey entry...

2/15--

Today I was super frustrated with my hair after workouts! SO I decided to go on a quest to see what I could find that would help to alleviate salt from my hair after each workout. After working out for 2 hours at the gym and ruining my style that I just spent 3 hours perfecting on Saturday, Monday rolls around and my kickboxing and body pump class at the gym caused me to sweat like I was hiking in the amazon and ruined my hair do! It’s the story of my life right now…  wash my hair on Thursday -- mess the hair up on Monday at the gym -- and have a “pony” Tues-Thursday at work. While this is a pretty good regiment, I’ve notices that the salt buildup that resides in my hair is not good and I notice some breakage. I decided to see what I could find that would cleanse my scalp without having to rewash and set my hair after a workout. I prefer to use all natural products, and have been doing so for the past year, After I left the gym, my sister called and to much of my surprise asked me what products I had been using my my hair because she wanted to buy some. Who knew? Just when you think your hair is a disaster, someone else sees the beauty in you and want to know what you are doing! So I gave her a list of my all natural products, then we somehow ended up meeting at Beauty First, which is in the same parking lot as my gym. My sister still gets the creamy crack in her hair, so she is not as concerned about alcohol free and all natural products as I am. I meet her there and guided her to a few products along with the sales girl. While there, I spotted the Ojon line – a product line that I have used in the pass—while on the creamy crack! They have a shampoo free hair cleanser that you spray in your hair and it is said to cleanse your scalp. Who knew! While on my journey to find some products for my sister, had I found my holy grail? Did the universe lead me exactly to what I was looking for and just pondered on that morning? Without looking at the price tag, I grabbed up the “holy grail” and could not wait to try it! Can you believe I did not even look at the ingredients? Not typical for me at all! I took it home and begin spraying on my hair as instructed on the bottle. I massaged and brushed it through my hair, wrapped my hair for the night with hopes of great success in the morning “comb down”. As I meditated and begin to unwind for the night while lying in my bed, it hit me… Sharron- you did not read the ingredients! What the?! All this hard word to keep chemicals and alcohol out of your hair and you work out for 2 hours, hit the sauna, skip dinner and you get momentarily delirious! (see what it’s so important to eat! It keeps your mind right  ) I got out of bed and realized the ingredients contained alcohol, sulphur etc.. all the things I was trying to rid my hair of. I begin to drift off initially angry with myself, then I realized that this is a process—and drifted off to sleep. Needless to say, the next morning – the “holy grail” was not worthy of such a title, at least for me and my current journey. It left my hair slightly brittle... while easy to manage, it did not provide the results I dreamed of… It could have been psychological- that I didn’t want it to work because it contained alcohol. So 2/16, I was back on my quest again. I decided to surf the net to see what all natural products provide a natural astringent. It hit me then that every morning, I cleanse my face after washing with a quick coat of witch hazel on a cotton swab. Could the same astringent that I used on my face cleanse my scalp? Hummmmm… I’ve heard that a lot of beauticians recommend this to their clients who get weaves to cleanse their scalp of impurities. I may try it.. Next I thought of tea tree oil. Tea Tree Oil (also known as Melaleuca) is a natural antibacterial disinfectant that treats several ailments. Tea Tree oil helps unblock clogged hair follicles, moisturizes hair and keeps the scalp free of bacteria and fungal problems. Could this be it?! Perhaps mixed with water or olive oil, hummmm... it would be my holy grail…. So guess I will try both. The search continues… I’ll keep you posted.


UPDATE: Tea tree oil mixed with water in a water bottle did the trick for me! love it!

LinkWithin

Related Posts Plugin for WordPress, Blogger...

ShareThis